Vorbereitung
- VPS mit Ubuntu 20.04/22.04/24.04 oder Debian 11/12.
- Benutzer mit sudo, SSH-Zugang.
- Domain (optional) und offener Port 80/443 im Panel des Providers.
Apache: Installation, Autostart und Überprüfung
					sudo apt update && sudo apt -y upgrade
sudo apt -y install apache2
sudo systemctl enable --now apache2
curl -I http://127.0.0.1
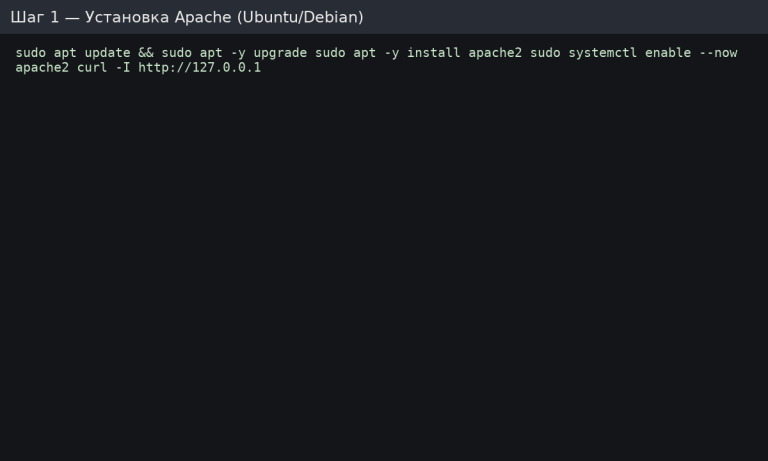
Erwartet HTTP/1.1 200 OK-Header. Die Standardseite befindet sich unter /var/www/html/.
UFW-Firewall für HTTP/HTTPS und Dienststatus
					sudo systemctl status apache2 --no-pager
sudo ufw allow 'Apache Full'   # opens 80 и 443
sudo ufw enable
sudo ufw status
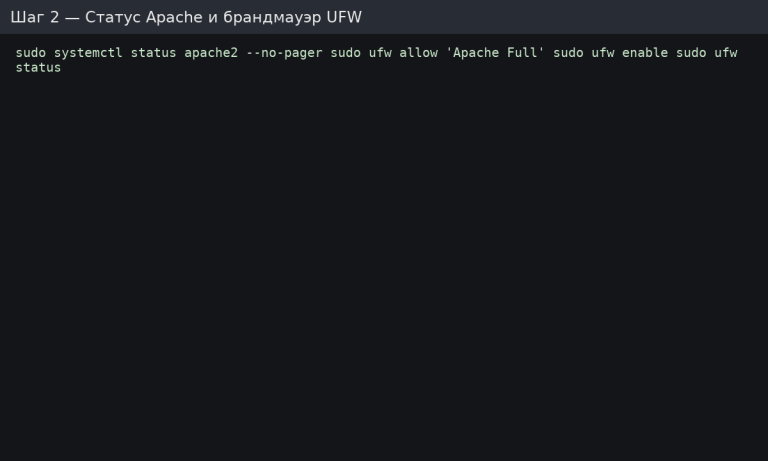
Wenn Sie UFW nicht verwenden, stellen Sie sicher, dass 80/443 in der Cloud-Firewall Ihres Providers zugelassen sind.
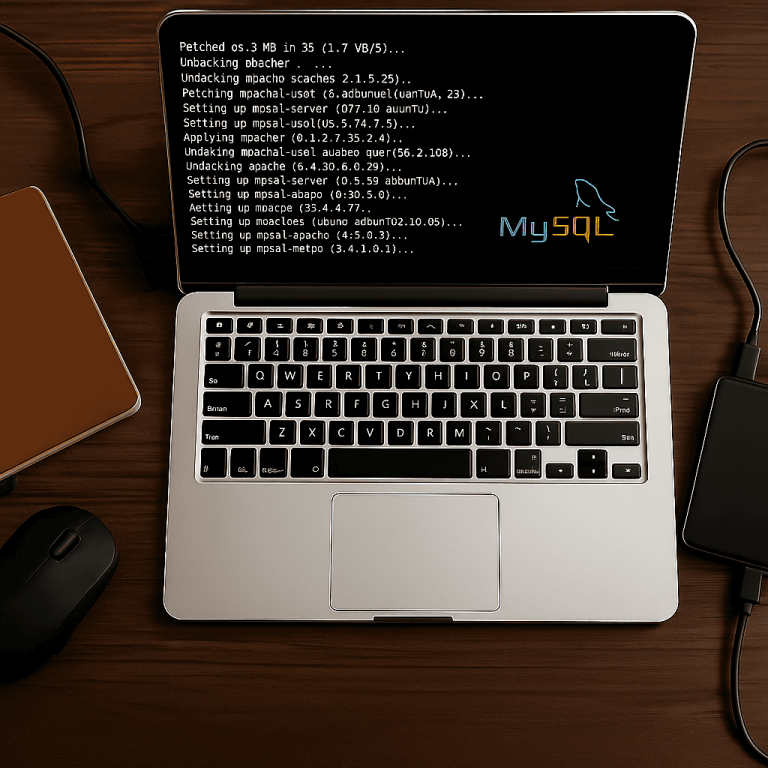
MySQL-Server: Installation und grundlegender Schutz
					sudo apt -y install mysql-server
sudo systemctl enable --now mysql
sudo mysql_secure_installation
Sicher antworten:
- Passwortstärkenprüfung aktivieren (Ja).
- Anonyme Benutzer entfernen (Ja).
- Remote-Root-Anmeldung verbieten (Ja).
- Testdatenbank entfernen (Ja).
- Berechtigungen neu laden (Ja).

Erstellen einer Datenbank und eines Benutzers für die Anwendung
sudo mysql -u root -p
In der MySQL-Konsole:
					CREATE DATABASE appdb CHARACTER SET utf8mb4 COLLATE utf8mb4_unicode_ci;
CREATE USER 'appuser'@'localhost' IDENTIFIED BY 'S3cureP@ss!';
GRANT ALL PRIVILEGES ON appdb.* TO 'appuser'@'localhost';
FLUSH PRIVILEGES;
EXIT;
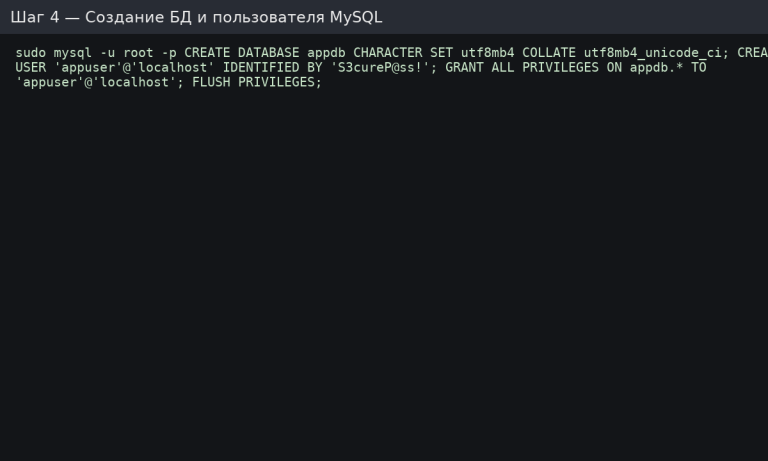
Für den Fernzugriff geben Sie den Host an: „appuser”@‘%’ und konfigurieren Sie die Bind-Adresse/Firewall separat.
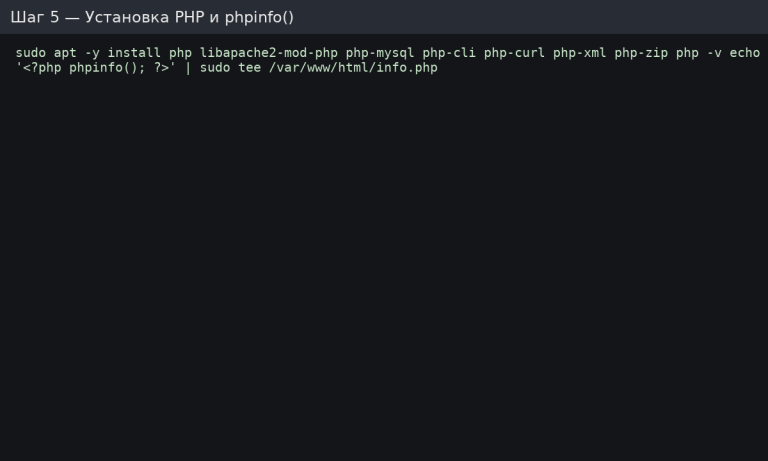
PHP: Modulinstallation und Testseite
					sudo apt -y install php libapache2-mod-php php-mysql php-cli php-curl php-xml php-zip
php -v
echo '<?php phpinfo(); ?>' | sudo tee /var/www/html/info.php
Öffnen Sie http://<IP>/info.php in Ihrem Browser, um die Seite phpinfo() anzuzeigen (löschen Sie sie anschließend).
Produktionsverzeichnis und virtueller Apache-Host
Erstellen wir die Website-Struktur und die Konfigurationsdatei:
					sudo mkdir -p /var/www/example.com/public_html
sudo chown -R $USER:$USER /var/www/example.com
sudo nano /var/www/example.com/public_html/index.php

index.php (verification PHP):
<?php echo "Hello from LAMP!"; ?>
Erstellen Sie die Konfigurationsdatei /etc/apache2/sites-available/example.com.conf:
					<VirtualHost *:80>
  ServerName example.com
  ServerAlias www.example.com
  DocumentRoot /var/www/example.com/public_html

  <Directory /var/www/example.com/public_html>
    AllowOverride All
    Require all granted
  </Directory>

  ErrorLog ${APACHE_LOG_DIR}/example_error.log
  CustomLog ${APACHE_LOG_DIR}/example_access.log combined
</VirtualHost>
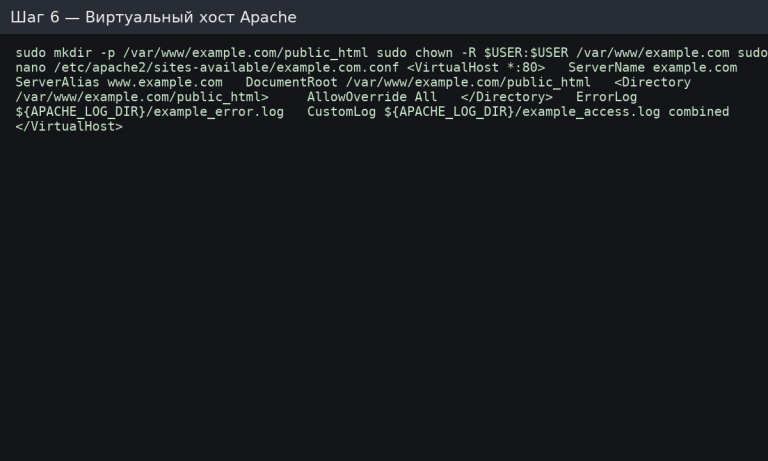
AllowOverride All ist erforderlich, wenn Sie .htaccess verwenden (Umschreibungen, Caching usw.).
Aktivieren Sie die Website, mod_rewrite, und lesen Sie die Konfiguration erneut ein.
					sudo a2ensite example.com.conf
sudo a2dissite 000-default.conf
sudo a2enmod rewrite
sudo apache2ctl configtest   # Syntax OK
sudo systemctl reload apache2

Überprüfen Sie die Website anhand der Domain oder IP-Adresse: „Hello from LAMP!“ sollte angezeigt werden.
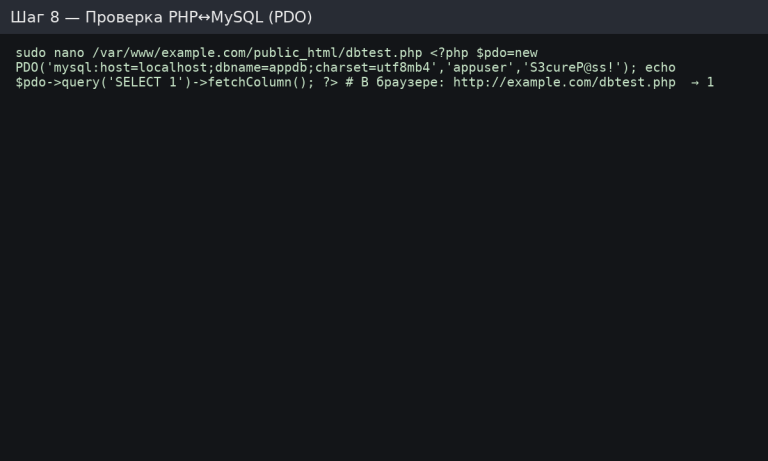
Überprüfen der PHP ↔ MySQL (PDO)-Verbindung
Erstellen Sie /var/www/example.com/public_html/dbtest.php:
					<?php
try {
  $pdo = new PDO('mysql:host=localhost;dbname=appdb;charset=utf8mb4','appuser','S3cureP@ss!', [
    PDO::ATTR_ERRMODE => PDO::ERRMODE_EXCEPTION,
    PDO::ATTR_DEFAULT_FETCH_MODE => PDO::FETCH_ASSOC
  ]);
  echo $pdo->query('SELECT 1')->fetchColumn();
} catch (Throwable $e) { echo $e->getMessage(); }
Öffnen Sie „http://example.com/dbtest.php“ → Sie sehen 1.
HTTPS in 2 Minuten (Bonus)
Wenn die Domain auf den Server verweist, installieren wir ein kostenloses Zertifikat:
					sudo apt -y install certbot python3-certbot-apache
sudo certbot --apache -d example.com -d www.example.com
Certbot aktiviert automatisch HTTPS und die automatische Verlängerung.
Konfiguration von PHP für die Produktion (kurz)
Bearbeiten Sie /etc/php/*/apache2/php.ini:
- expose_php = Off
- memory_limit = 256M (abhängig von der Auslastung)
- upload_max_filesize und post_max_size entsprechend Ihrem CMS
- date.timezone = Europe/Kyiv
- Apache neu starten: sudo systemctl reload apache2.
Analoga für AlmaLinux/Rocky/CentOS (RHEL)
					sudo dnf -y install httpd mariadb-server php php-mysqlnd php-cli php-xml php-zip php-curl
sudo systemctl enable --now httpd mariadb
sudo mysql_secure_installation
# дальше — те же шаги: создать БД/пользователя, vhost в /etc/httpd/conf.d/site.conf,
# включить firewalld: sudo firewall-cmd --add-service=http --add-service=https --permanent && sudo firewall-cmd --reload
LAMP-Start-Checkliste
- Apache läuft, 80/443 sind offen, mod_rewrite ist aktiviert.
- MySQL ist gesichert, appdb und appuser sind erstellt.
- PHP ist mit den erforderlichen Modulen installiert, info.php wurde entfernt.
- Virtual Host ist aktiviert, AllowOverride All ist eingestellt.
- dbtest.php gibt 1 zurück (PDO funktioniert).
- HTTPS ist aktiviert (sofern eine Domain vorhanden ist), cron/auto-renew ist aktiv.


