
Remote Desktop is the most convenient way to administer a Windows server. If you need multiple users, RemoteApp, or a full “terminal server” experience, you’ll use Remote Desktop Services (RDS) instead of just basic RDP administration.
For stable performance and predictable latency, start with a reliable Windows VPS on fast VPS hosting and then build your RDS setup on top.
RDP is the protocol and client connection method (mstsc / Microsoft Remote Desktop). RDS is the Windows Server role set that turns your server into a shared desktop / RemoteApp platform.
In practice, there are two common scenarios:
Important: If you’re building a real multi-user terminal server, plan licensing and security from day one. The goal is to provide access to users without exposing your server to brute-force attacks.
On Windows, the fastest option is the built-in client: press Win + R → type mstsc → enter the server IP/hostname. On macOS, use Microsoft Remote Desktop from the App Store.
In the RDP client settings, it’s useful to enable:
If Remote Desktop is not enabled yet, turn it on and immediately enforce safer defaults.
Recommended baseline: enable Remote Desktop, require Network Level Authentication (NLA), and allow access only to the users/groups you actually need.
# Enable Remote Desktop (RDP) in the registry
Set-ItemProperty -Path 'HKLM:SystemCurrentControlSetControlTerminal Server' -Name 'fDenyTSConnections' -Value 0

# Require Network Level Authentication (recommended)
Set-ItemProperty -Path 'HKLM:SystemCurrentControlSetControlTerminal ServerWinStationsRDP-Tcp' -Name 'UserAuthentication' -Value 1

# Enable built-in Windows Firewall rules for Remote Desktop
Enable-NetFirewallRule -DisplayGroup "Remote Desktop"
Do not keep RDP open “to everyone”. If possible, restrict inbound RDP by your IP address (or use RD Gateway over 443) before you put the server into production.
There are two realistic approaches for most Windows VPS use-cases:
This is the simplest path when you only need a single server to host multiple sessions. Typically you install:
This option is popular for small teams, dev environments, or when you don’t need a full portal (RD Web) and gateway.
If you need cleaner user onboarding, RemoteApp publishing, a web portal, and safer external access, use a standard deployment with these roles:
For a minimal “production-shaped” setup, many admins place Broker + Web Access + Licensing on one server and keep Session Host on another (or multiple Session Hosts if you scale).
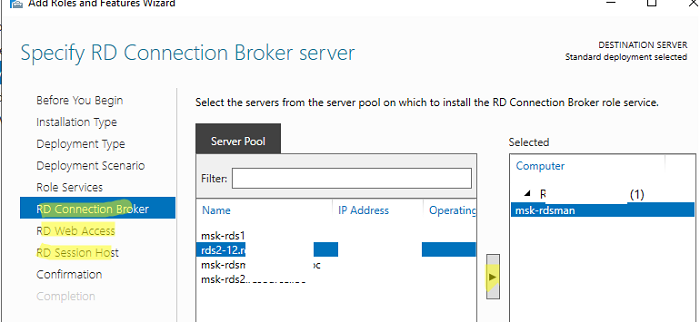
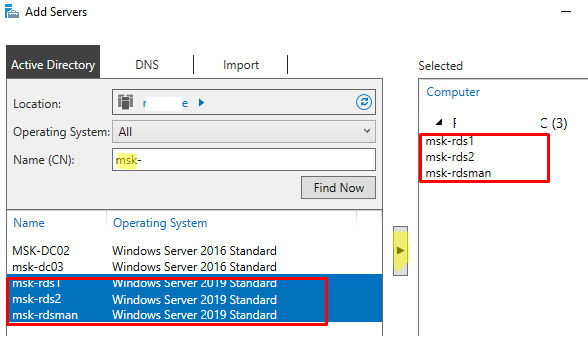
You can install roles via Server Manager (recommended for clarity) or via PowerShell (useful for automation).
# Installs Session Host + Licensing roles
Install-WindowsFeature -Name RDS-RD-Server, RDS-Licensing -IncludeManagementTools

# Reboot is often required after role installation
Restart-Computer
Tip: For a standard deployment (Broker/Web/Gateway), install using the RDS deployment wizard first, then adjust with PowerShell if needed. This reduces the chance of missing role dependencies.
RDS licensing is not “optional configuration” — it’s a core part of a stable environment. The practical goal is simple:
Per User is often chosen for “one person → many devices”. Per Device is often chosen for shared workstations / thin clients. Pick one mode and document it.
To open the licensing console:
# RD Licensing Manager
licmgr.exe
After activation and CAL installation, validate that the Session Host can reach the licensing server and that the deployment is not stuck in a misconfigured mode.
In RDS, users connect to a collection (a managed pool of session hosts with policies). Collections are where you set session limits, user groups, and (optionally) user profile disk behavior.
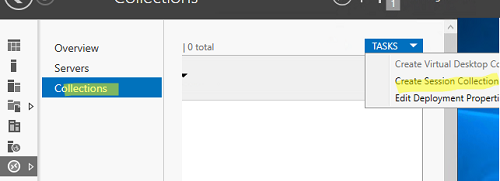
# Create a basic collection
# Replace placeholders with your server names and AD group
New-RDSessionCollection -CollectionName "RDS-Users" `
  -SessionHost @("RDSH01.domain.local") `
  -ConnectionBroker "RDCB01.domain.local" `
  -CollectionDescription "User sessions for the team"

# Example: set session limits (idle/disconnect)
Set-RDSessionCollectionConfiguration -CollectionName "RDS-Users" `
  -ConnectionBroker "RDCB01.domain.local" `
  -IdleSessionLimitMin 30 `
  -DisconnectedSessionLimitMin 60
Best practice: grant access through a group (e.g., “RDS-Users”), not by adding users one by one. This keeps onboarding/offboarding predictable.
RemoteApp allows users to run a specific application without providing a full desktop. It reduces confusion (“where are my files?”), lowers support load, and often feels faster for end users.
Typical RemoteApp candidates:
Exposing RDP (3389) to the public internet is one of the most common reasons Windows servers get attacked. A stronger approach is to publish access through RD Gateway over HTTPS (443) with a proper certificate.
If you’re deploying RDS for business users, RD Gateway is usually worth it: you get TLS-protected access, cleaner auditing, and you can keep 3389 closed from the outside.
# Example: assign a certificate to RDS roles (certificate must match DNS name)
# Run on the Connection Broker, replace thumbprint and FQDN
Set-RDCertificate -Role RDGateway -Thumbprint "AAAAAAAAAAAAAAAAAAAAAAAAAAAAAAAAAAAAAAAA" -ConnectionBroker "RDCB01.domain.local" -Force
Set-RDCertificate -Role RDWebAccess -Thumbprint "AAAAAAAAAAAAAAAAAAAAAAAAAAAAAAAAAAAAAAAA" -ConnectionBroker "RDCB01.domain.local" -ForceAlways think in two layers: provider firewall (panel) and Windows Firewall.
# Quick connectivity test from a client / jump host
Test-NetConnection <server-ip-or-hostname> -Port 3389
Test-NetConnection <server-ip-or-hostname> -Port 443RDS performance depends heavily on RAM and disk I/O. If logins are slow, apps freeze during peak hours, or multiple users complain about lag, it’s usually time to scale resources.
A correct RDS setup is not just “turn on Remote Desktop”. It’s a controlled environment: secure access, proper licensing, collections for users, and clean publishing for desktops/apps.
If you want predictable performance for remote work and Windows applications, deploy on a reliable Windows VPS with scalable resources on VPS hosting and build your RDS stack the right way from day one.