
IIS (Internet Information Services) is the native Windows web server for hosting ASP.NET, .NET applications, APIs, and classic websites. With the right configuration, IIS is stable, fast, and easy to maintain on a Windows Server.
If you plan to host production websites or APIs, start with a reliable Windows VPS on fast VPS hosting so storage latency and CPU scheduling don’t become your bottleneck.
You can install IIS via Server Manager (GUI), PowerShell, or DISM. For most admins, Server Manager is the clearest method; for automation, PowerShell is ideal.
# Install IIS and management tools
Install-WindowsFeature -Name Web-Server -IncludeManagementTools

# (Optional) Install common extras for apps
Install-WindowsFeature -Name Web-Http-Redirect, Web-Stat-Compression, Web-Dyn-Compression# Example (features vary by OS image)
dism /online /enable-feature /featurename:IIS-WebServerRole /allAfter installation, the default site usually serves content from C:inetpubwwwroot. Verify locally first, then from the outside.
# Check service status
sc query w3svc

# Quick local HTTP check
curl.exe -I http://127.0.0.1/
Even if your provider firewall is open, Windows Server may still block traffic. Create explicit inbound rules for 80/443.
New-NetFirewallRule -DisplayName "HTTP (80)"  -Direction Inbound -Protocol TCP -LocalPort 80  -Action Allow
New-NetFirewallRule -DisplayName "HTTPS (443)" -Direction Inbound -Protocol TCP -LocalPort 443 -Action AllowFor production, keep each site in its own directory and avoid mixing content across apps. A common pattern is:
C:Sitesexample.compublicCreate a test page to validate the binding:
New-Item -ItemType Directory -Path "C:Sitesexample.compublic" -Force
Set-Content -Path "C:Sitesexample.compublicindex.html" -Value "Hello from IIS on Windows Server"
Permissions tip: the simplest stable approach is to let the Application Pool identity read the directory, and grant write access only if your app needs uploads/logs in a specific folder.
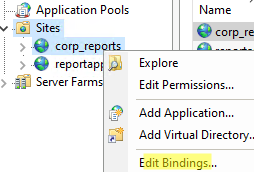
In IIS Manager:
example.comC:Sitesexample.compublicexample.comWhy host name matters: it prevents “wrong site opens” problems when you host multiple websites on one server.
For production websites, HTTPS is mandatory. In IIS, the standard workflow is:
# Import a PFX to LocalMachineMy
$pwd = Read-Host -AsSecureString "PFX password"
Import-PfxCertificate -FilePath "C:Tempsite.pfx" -CertStoreLocation "Cert:LocalMachineMy" -Password $pwdIn IIS Manager: select your site → Bindings… → Add → Type: https → Port: 443 → Host name: example.com → check Require Server Name Indication if needed → choose the certificate.
Even a clean IIS install benefits from a minimal “production-ready” baseline:
iisreset
curl.exe -I http://127.0.0.1/C:inetpublogsLogFilesIf you see slow responses under load, high CPU during peak hours, or long disk response times in monitoring, it’s time to scale resources. IIS performance is often limited by CPU (dynamic rendering) or disk I/O (logs, cache, app files).
Installing IIS is easy — the quality comes from correct bindings, HTTPS, firewall rules, and predictable folder/permission structure. With these basics in place, IIS becomes a stable platform for Windows web hosting.
Deploy your websites on a reliable Windows VPS with scalable resources on VPS hosting to keep performance consistent as traffic grows.